« GPVehicle » : différence entre les versions
| Ligne 32 : | Ligne 32 : | ||
<syntaxhighlight lang="java"> | <syntaxhighlight lang="java"> | ||
// PROPULSION | // PROPULSION | ||
final ArrayList<CustomEngine> enginesList = new ArrayList< | final ArrayList<CustomEngine> enginesList = new ArrayList<Engine>(); | ||
enginesList.add(new | enginesList.add(new Engine("OCS", 320., 1000.)); | ||
enginesList.add(new | enginesList.add(new Engine("ACS", 150., 270.)); | ||
final ArrayList<CustomFuelTank> fuelTankList = new ArrayList< | final ArrayList<CustomFuelTank> fuelTankList = new ArrayList<FuelTank>(); | ||
fuelTankList.add(new CustomFuelTank("Tank1", 500.)); | fuelTankList.add(new CustomFuelTank("Tank1", 500.)); | ||
</syntaxhighlight> | </syntaxhighlight> | ||
Note : the CustomEngine and CustomFuelTank class. | |||
=== Shape characteristics initializaton === | === Shape characteristics initializaton === | ||
Version du 9 octobre 2018 à 14:53
How to call it
For using the GPVehicle class, the developer has only to create such an object with these two possibilities:
- With no vehicle initialization
veh = new GPVehicle("My Vehicle");
- Or, if we want to initialize the widget with a predefined vehicle:
final CustomVehicle vehicle = new Vehicle(…);
veh = new GPVehicle("My Vehicle", vehicle);
Since the V2.0 version (and thus the [PATRIUS] V4.1.1), it is now possible to use directly the Vehicle class. So, it is possible to search in [PATRIUS] documentation how it is possible to initialize such an object. We have then to instantiate this class using all the previous sub-objects described in the following paragraphs.
Note that for the previous V1.3(.1) versions, it was mandatory to use the specific GENOPUS [ https://genopus.cnes.fr/uploads/JavaDocs/V1.3.1 /fr/cnes/genopus/nonWidget/vehicle/CustomVehicle.html CustomVehicle] class.
Dry mass initialization
// DRY MASS
final double dryMass = 1000.;
MassProperty dryMassProperty = new MassProperty(dryMass);
Propulsive properties initialization
// PROPULSION
final ArrayList<CustomEngine> enginesList = new ArrayList<Engine>();
enginesList.add(new Engine("OCS", 320., 1000.));
enginesList.add(new Engine("ACS", 150., 270.));

final ArrayList<CustomFuelTank> fuelTankList = new ArrayList<FuelTank>();
fuelTankList.add(new CustomFuelTank("Tank1", 500.));
Note : the CustomEngine and CustomFuelTank class.
Shape characteristics initializaton
// SHAPE (HERE PARALLELEPIPED + SOLAR PANELS)
final CustomParallelepiped parall =
   new CustomParallelepiped(4.0, 1.0, 2.0);
final CustomParallelepiped solarPanels =
   new CustomParallelepiped(10., 0., 0.);
vehicleRefSurface = new CustomVehicleSurfaceModel(parall, solarPanels);
Aerodynamic properties initialization
// AERODYNAMIC PROPERTIES (CONSTANT COEFFICIENTS)
final double cd = 2.0;
final double cl = 0.;
final CustomAerodynamicProperties aerodynamicProperties =
   new CustomAerodynamicProperties(vehicleRefSurface, cd, cl);
Note: we need the shape model previously defined
Radiative properties initialization
// RADIATIVE PROPERTIES
final double ka = 1.0;
final double ks = 0.0;
final double kd = 0.0;
final RadiativeProperty rp = new RadiativeProperty(ka, ks, kd);

final double absorptionCoef = 1.0;
final double specularCoef = 0.0;
final double diffuseCoef = 0.0;
final RadiativeIRProperty rpIr =
   new RadiativeIRProperty(absorptionCoef, specularCoef, diffuseCoef);

final CustomRadiativeProperties radiativeProperties =
   new CustomRadiativeProperties(rp, rpIr, vehicleRefSurface);
Note: we need the shape model previously defined
Vehicle initialization
At last, when all sub-objects are available, we have just to write this:
final CustomVehicle vehicle =
   new CustomVehicle(dryMassProperty, aerodynamicProperties,
                     radiativeProperties, enginesList, fuelTankList);
Note: of course, possible to put null to some of them except for dry mass properties (a zero value for it will raise a warning as a negative one an error).
Display
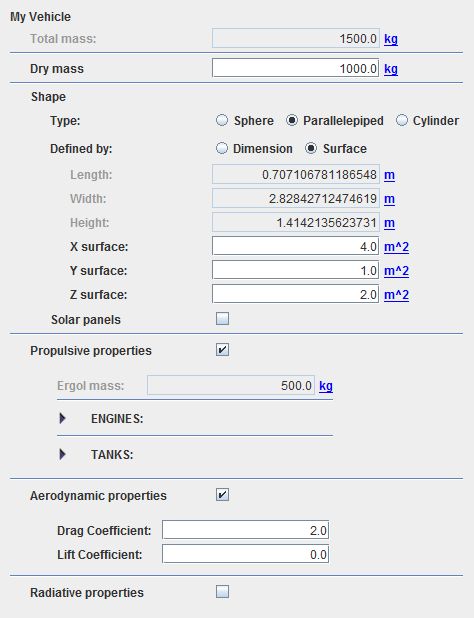
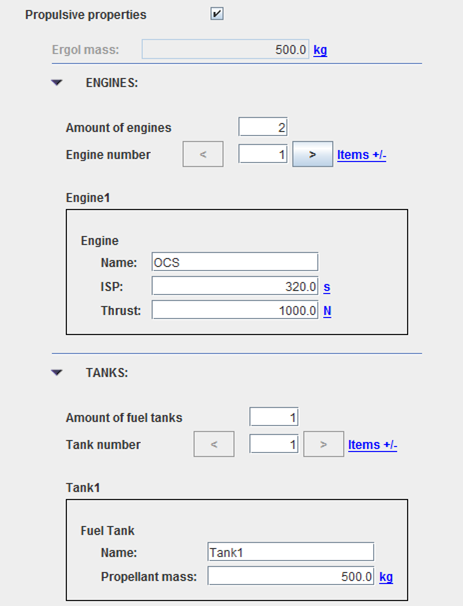
With the previous initialization and by clicking on the engines and/or tanks for more information, we will have this display:
How to use it
To get a GENOPUS CustomVehicle object, we will just have to call for the getPatriusObject() method as below:
CustomVehicle vehicle = veh.getPatriusObject();
How it is stored
Here is the XML format for such a vehicle:
  <Vehicle name="My_Vehicle">
    <Boolean name="hasMassProperties">true</Boolean>
    <MassProperties name="massProperties">
      <Real name="dryMass" unit="kg">1.0E3</Real>
    </MassProperties>
    <Boolean name="hasPropulsiveProperties">true</Boolean>
    <PropulsiveProperties name="PropulsiveProperties">
      <Real name="ergMass" unit="kg">5.0E2</Real>
      <ComponentList name="listOfEngines">
        <!--Amount of items-->
        <Integer name="nbItems">2</Integer>
        <ComponentListItem name="Item_1">
          <Engine name="Engine">
            <String name="name">OCS</String>
            <Real name="isp" unit="s">3.2E2</Real>
            <Real name="thrust" unit="N">1.0E3</Real>
          </Engine>
        </ComponentListItem>
        <ComponentListItem name="Item_2">
          <Engine name="Engine">
            <String name="name">ACS</String>
            <Real name="isp" unit="s">1.5E2</Real>
            <Real name="thrust" unit="N">2.7E2</Real>
          </Engine>
        </ComponentListItem>
      </ComponentList>
      <ComponentList name="listOfTanks">
        <!--Amount of items-->
        <Integer name="nbItems">1</Integer>
        <ComponentListItem name="Item_1">
          <FuelTank name="Fuel_Tank">
            <String name="name">Tank1</String>
            <Real name="propMass" unit="kg">5.0E2</Real>
          </FuelTank>
        </ComponentListItem>
      </ComponentList>
    </PropulsiveProperties>
    <Boolean name="hasAerodynamicProperties">true</Boolean>
    <AerodynamicProperties name="AerodynamicProperties">
      <Real name="dragCoefficient">2.0E0</Real>
      <Real name="liftCoefficient">0.0E0</Real>
    </AerodynamicProperties>
    <Boolean name="hasRadiativeProperties">false</Boolean>
    <Shape name="VehicleShape">
      <String name="shapeType">Parallelepiped</String>
      <String name="shapeDefinitionType">Surface</String>
      <Real name="sx" unit="m^2">4.0E0</Real>
      <Real name="sy" unit="m^2">1.0E0</Real>
      <Real name="sz" unit="m^2">2.0E0</Real>
      <Boolean name="withSolarPanels">false</Boolean>
    </Shape>
  </Vehicle>

